Blog
Garage Door Remote Not Working? It Might Just Be the Battery!
Door Serv Pro
Reviewed by the Door Serv Pro service team · Trained, professional garage door technicians
When Your Garage Remote Goes Silent: A Simple Fix Awaits
Garage remote battery change is often the quickest solution when your garage door remote stops responding. Here's what you need to know right away:
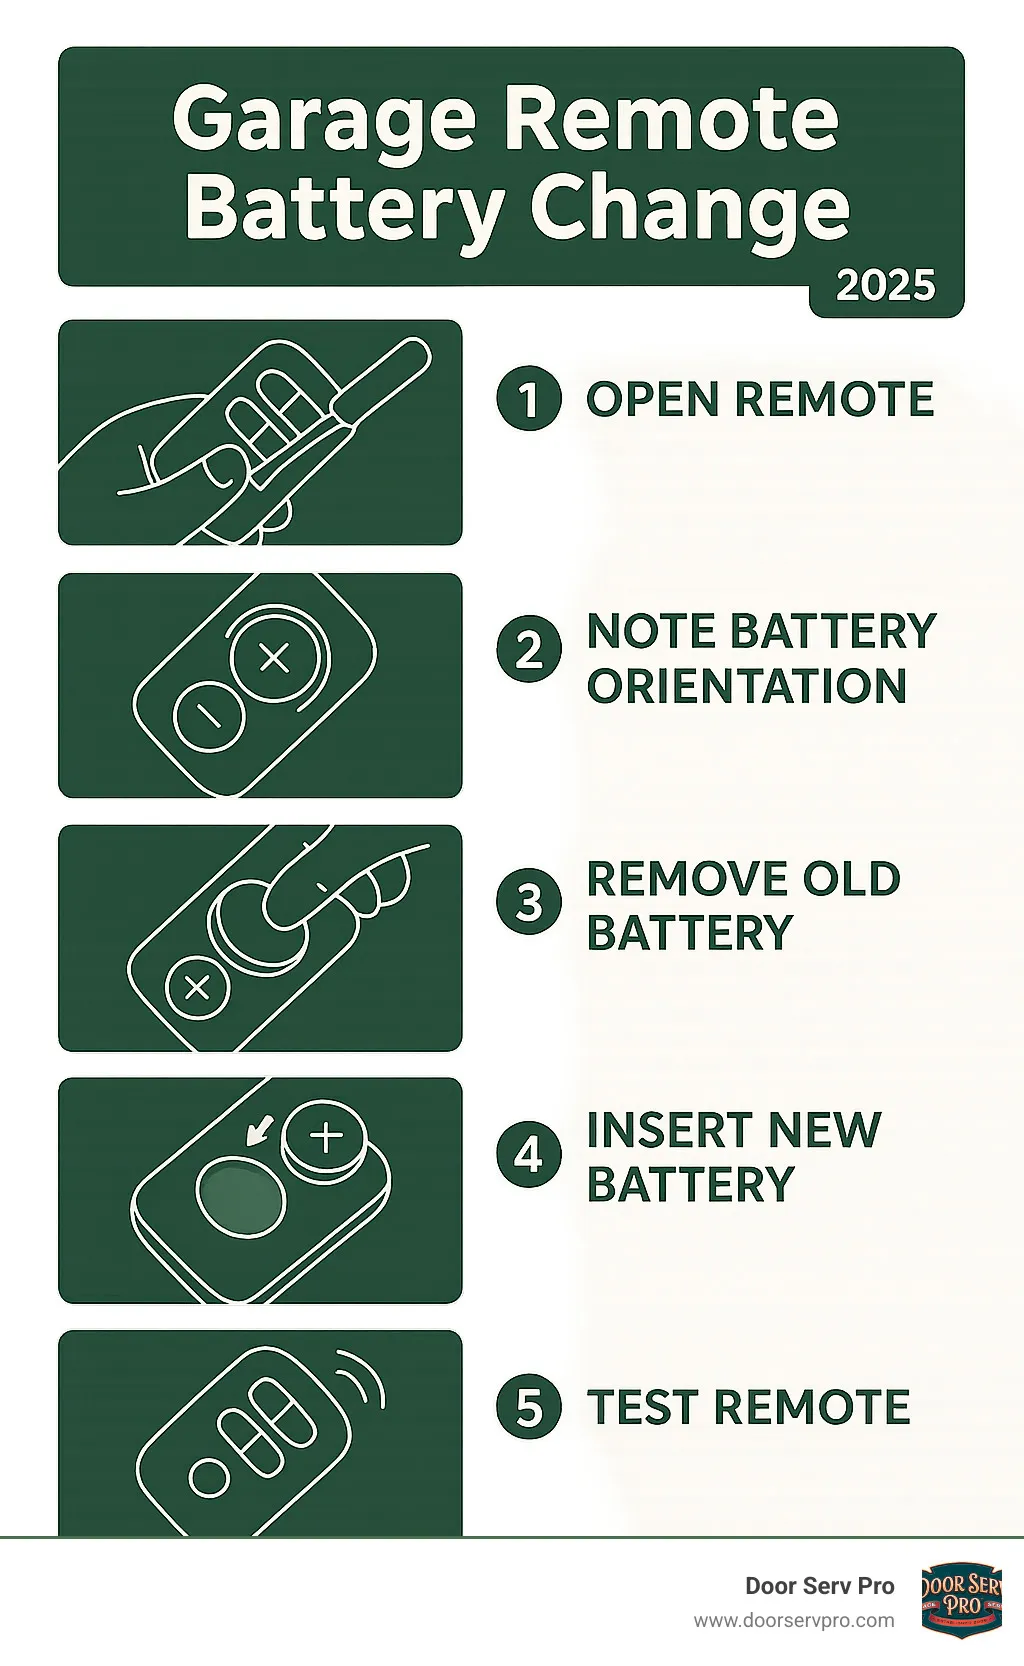
Quick Battery Change Steps:
- Open the remote – Slide cover, unscrew back, or pry apart casing
- Note battery orientation – Check positive (+) and negative (-) positions
- Remove old battery – Lift out carefully
- Insert new battery – Match the original orientation exactly
- Test and reassemble – Close case and test functionality
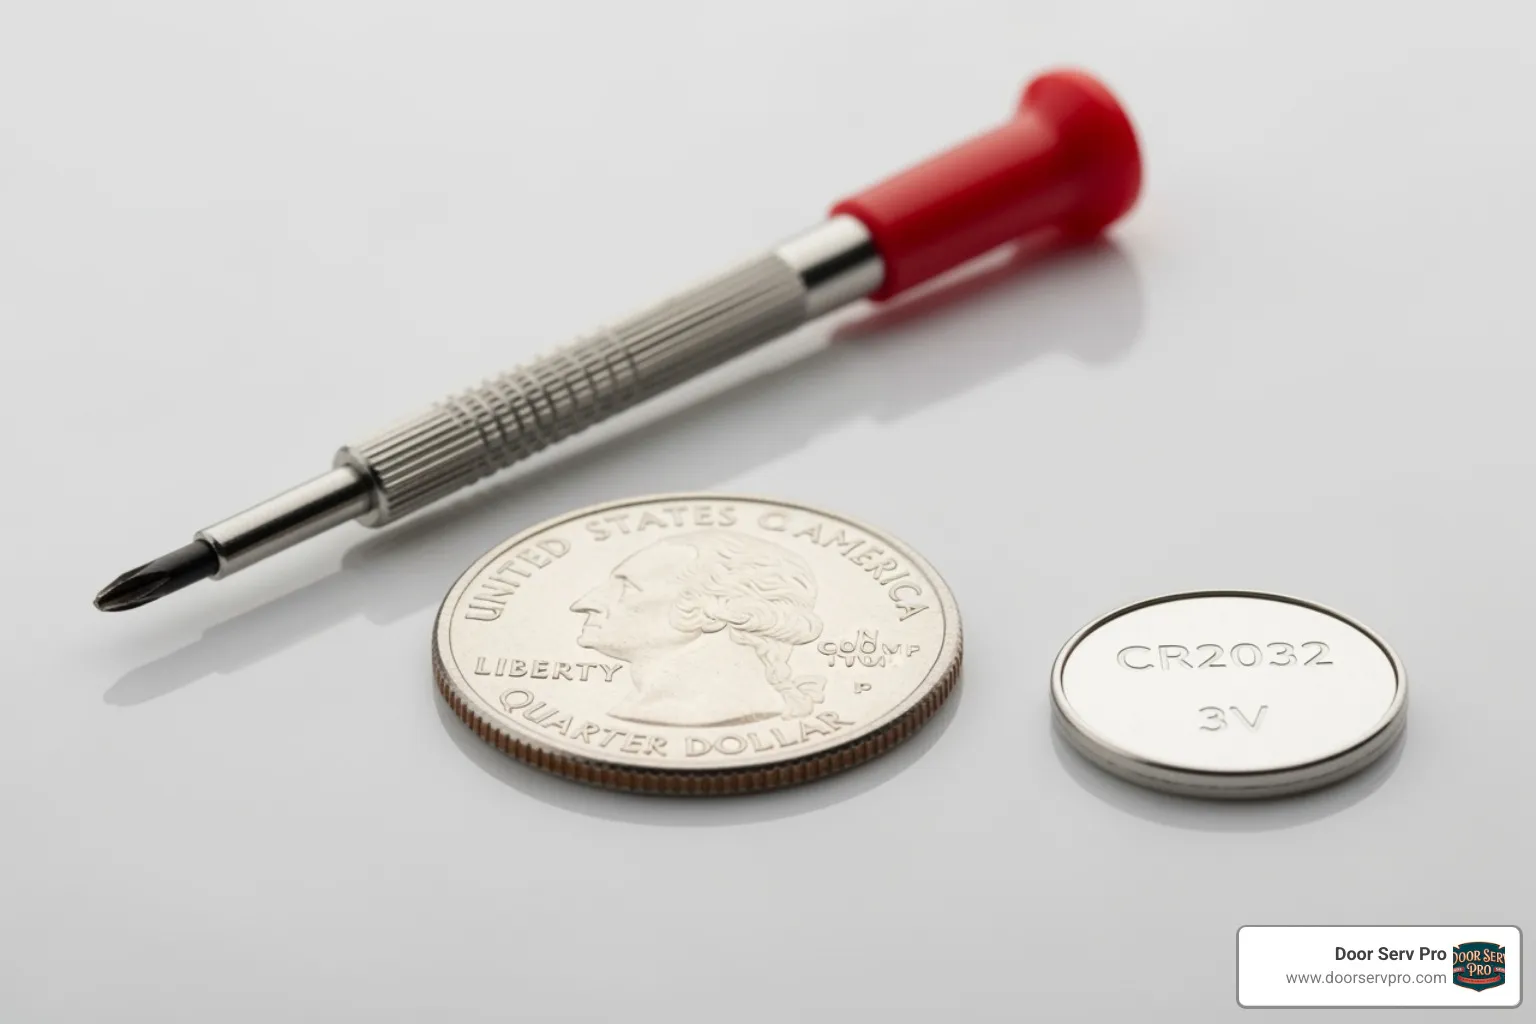
Most garage remotes use common batteries like CR2032 (coin-style) or 27A (cylindrical), and the average battery lasts 2 years with normal use.
You're rushing to work, hit your garage remote, and… nothing. The door stays shut, and you're officially stuck. Before you panic or call for expensive repairs, there's a 90% chance your problem has a simple solution that takes less than 5 minutes to fix.
Dead batteries are the most common cause of garage remote failures. The good news? This is one home maintenance task that doesn't require special skills, expensive tools, or a service call.
In most cases, you'll need nothing more than a small screwdriver and a replacement battery that costs under $5. Whether your remote uses a coin-sized CR2032 battery or a cylindrical 27A 12V battery, the process is surprisingly straightforward once you know the steps.
Is It Really the Battery? 4 Telltale Signs to Look For
Before you grab your screwdriver and start hunting for replacement batteries, let's make sure we're solving the right problem. While garage remote battery change fixes most remote issues, it helps to confirm what you're dealing with first.
Think of your garage remote like an old friend who's getting a bit tired. The signs are usually pretty obvious once you know what to look for.
Diminished range is probably the most common early warning sign. Remember when you could hit that button from halfway down the block? Now you're practically kissing your garage door before it responds. When your remote's range shrinks from "impressive" to "pathetic," that battery is definitely running on fumes.
You might also notice you're becoming a multiple button presser. One gentle press used to do the trick, but now you're mashing that button like you're trying to win a game show. If you find yourself holding the button down longer or pressing it several times to get any response, your battery is waving a white flag.
Inconsistent operation is another dead giveaway. Your remote works perfectly on Monday morning but ignores you completely on Tuesday evening. This on-again, off-again behavior means your battery has just enough juice to work sometimes – but not reliably.
Finally, check for that little indicator light on your remote. Most garage door remotes have a small LED that lights up when you press a button. If this light is dim, flickering, or completely dark, you've found your culprit. No light usually means no power.
Here's a quick sanity check before you dive into any garage remote battery change: walk over to your wall control unit inside the garage and make sure the lock button isn't engaged. Some wall controls have a "vacation" or "lock" feature that disables all remotes. It's a simple thing to check, but you'd be surprised how often this little button causes unnecessary panic!
Your Step-by-Step Guide to a Garage Remote Battery Change
Ready to bring your remote back to life? Don't worry – a garage remote battery change is one of those satisfying DIY wins that'll have you feeling like a home maintenance hero. Most people are amazed at how straightforward this really is once you know what you're doing.
Before we dive in, let's talk safety for just a moment. While changing a remote battery is about as safe as home projects get, it's worth handling batteries with care. Keep metal objects away from battery terminals, and we'll make sure you know how to dispose of that old battery properly.
For additional visual guidance, you might find this helpful resource useful: Replace the Battery on a Garage Opener.
Step 1: Getting the Right Tools and Battery
The beauty of this project is that you probably already have everything you need lying around the house. You won't need to raid a toolbox – just gather a few simple items to make the job smooth and easy.
Your small screwdriver is the most important tool here. Depending on your remote's design, you might need either a Phillips head or flathead variety. Those tiny screwdrivers from glasses repair kits are often perfect for this job. A coin like a penny can be incredibly handy for remotes with pry-open cases – it gives you just the right leverage without scratching the plastic.
Of course, you'll need the replacement battery itself. We'll dive deep into finding the right one in the next section, but for now, just know that getting the exact match is crucial for proper function.
Your owner's manual isn't technically a tool, but it's worth digging up if you still have it. These manuals often contain specific battery replacement instructions and will tell you exactly which battery type your remote needs. Lost the manual? No problem – we've got you covered with our identification tips coming up.
Step 2: Opening the Remote Casing
Here's where things get interesting, because garage remotes come in more varieties than ice cream flavors. The key is being gentle and patient – you want to open the case without turning those plastic clips into expensive confetti.
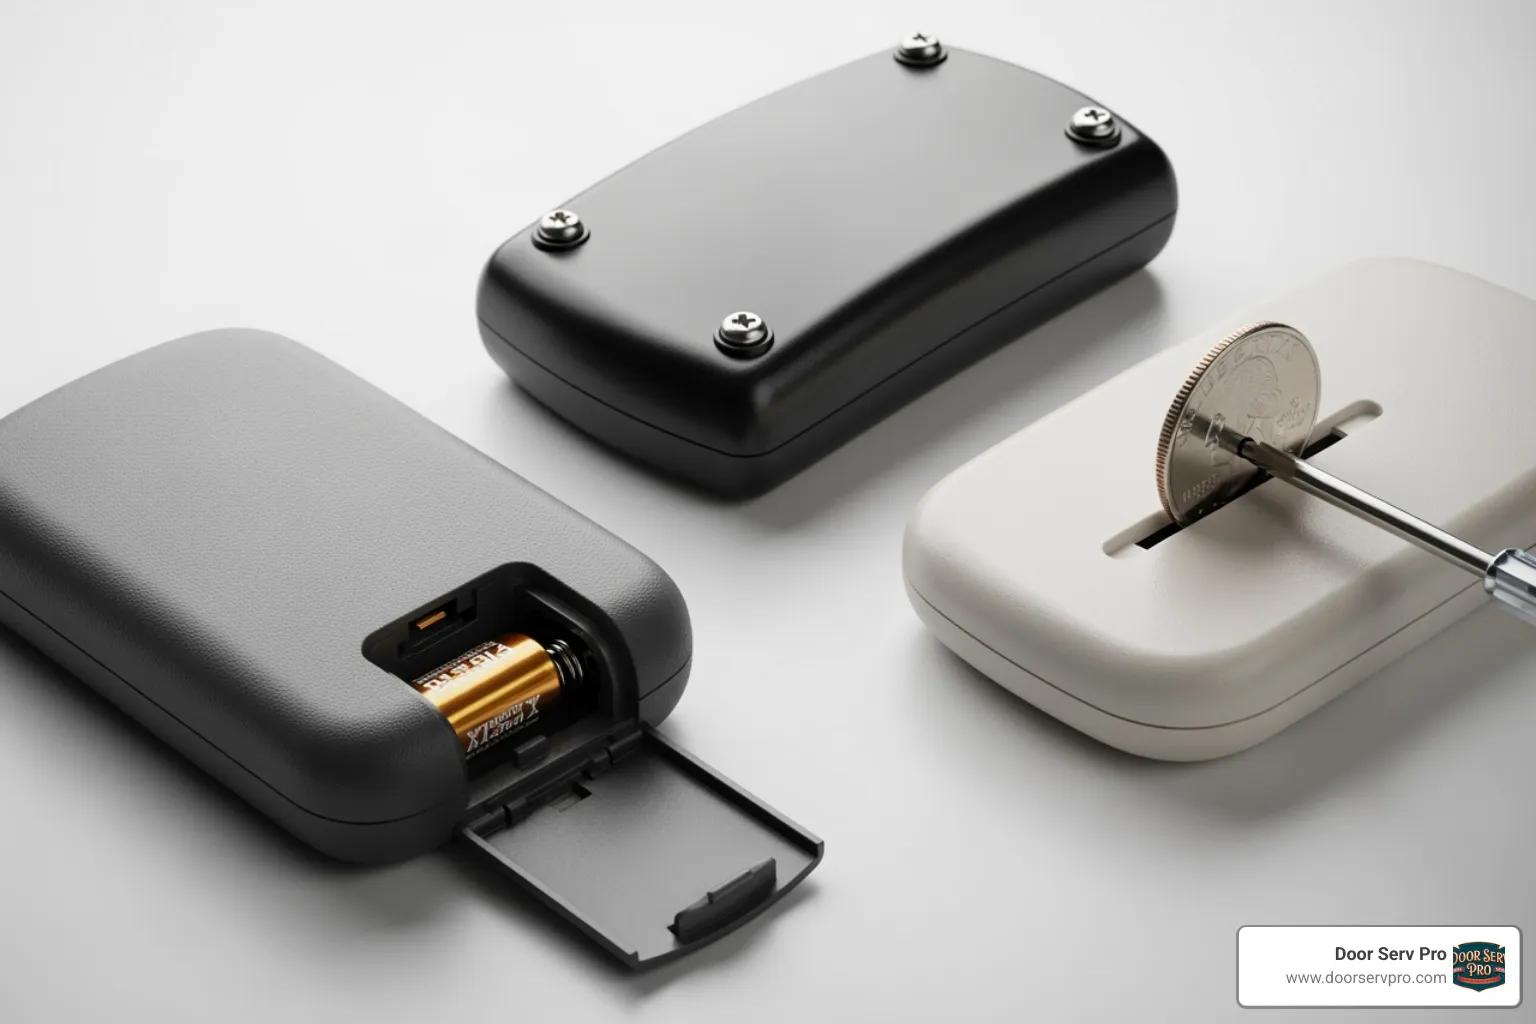
Many remotes feature a sliding cover design – look for a small ridge or groove that indicates which direction to push or slide. These are usually the friendliest to work with and often slide right off with gentle pressure.
Screw-secured cases are common on older or more robust remotes. You'll spot one or more tiny screws on the back cover. Remove these carefully with your small screwdriver, and the back should lift right off. Keep those screws somewhere safe – they have a talent for disappearing when you need them most.
Pry-open cases require a bit more finesse. Look for a small notch or indentation along the seam where the two halves meet. Insert your flathead screwdriver or coin into this notch and gently twist to separate the halves. Think "gentle persuasion" rather than "brute force."
Some keychain-style remotes have unique opening methods. You might need to push inward on the keychain attachment while flicking the casing upward, or pull an inner section out of an outer casing. Each manufacturer seems to have their own approach to this puzzle.
Once you've successfully opened your remote, take a moment to appreciate the engineering inside. You might notice some dust has accumulated – a small, soft brush can help clean things up, just be gentle around those tiny electronic components.
Step 3: Replacing the Old Battery
Now for the main event of your garage remote battery change. This step requires attention to detail, but it's quite straightforward once you know what to look for.
Before touching that old battery, take a good look at how it's positioned. Batteries have positive (+) and negative (-) sides, and getting this orientation right is absolutely critical. The positive side is usually facing up, but don't assume – really look at the markings inside the battery compartment or on the battery itself.
Removing the old battery is usually just a matter of gently lifting it out. Coin-style batteries often sit in a small tray or under a spring-loaded metal clip. Cylindrical batteries typically have spring contacts that compress when you remove the battery.
Here's a pro tip: if you notice any grime or corrosion on the battery contacts, now's a great time for a little cleaning. A cotton swab with just a tiny bit of rubbing alcohol can work wonders. Let everything dry completely before moving to the next step.
Installing the new battery should feel like putting the final piece in a puzzle – it should fit snugly and naturally. Double-check that positive and negative orientation one more time. For cylindrical batteries, make sure that negative end is against the spring contact. When it's right, you'll know it.
Step 4: Testing and Reassembly
You're in the home stretch now, and this is where the satisfaction really kicks in.
Before you close everything up, do a quick test with the battery in place. Press one of the remote buttons – if there's an LED indicator light, it should now shine bright and clear. This simple test confirms your new battery is working and properly installed.
Closing the case requires the same gentle approach you used to open it. Line up those two halves carefully and press them together until you hear or feel them click into place. If you removed screws, thread them back in snugly but don't overtighten – plastic can crack if you're too enthusiastic.
Here's some good news: most garage door remotes don't require reprogramming after a battery change. The remote's memory typically stays intact during the brief power loss. However, some older models might need to be resynced with your garage door opener's "learn" button. If your remote doesn't respond after the battery change, this reprogramming step is your next move.
Now comes the moment of truth – your final test. Walk out to your garage door and give that remote a try. It should respond quickly and reliably from your usual distance. If it works perfectly, congratulations! You've just completed a successful DIY repair that could have cost you a service call.
If things aren't working quite right yet, don't worry. We've got troubleshooting steps coming up that will help you get everything sorted out.
Finding the Right Replacement Battery
The success of your garage remote battery change hinges entirely on using the correct replacement battery. Using the wrong type, even if it fits, can damage your remote or simply not work.
Common Garage Remote Battery Types
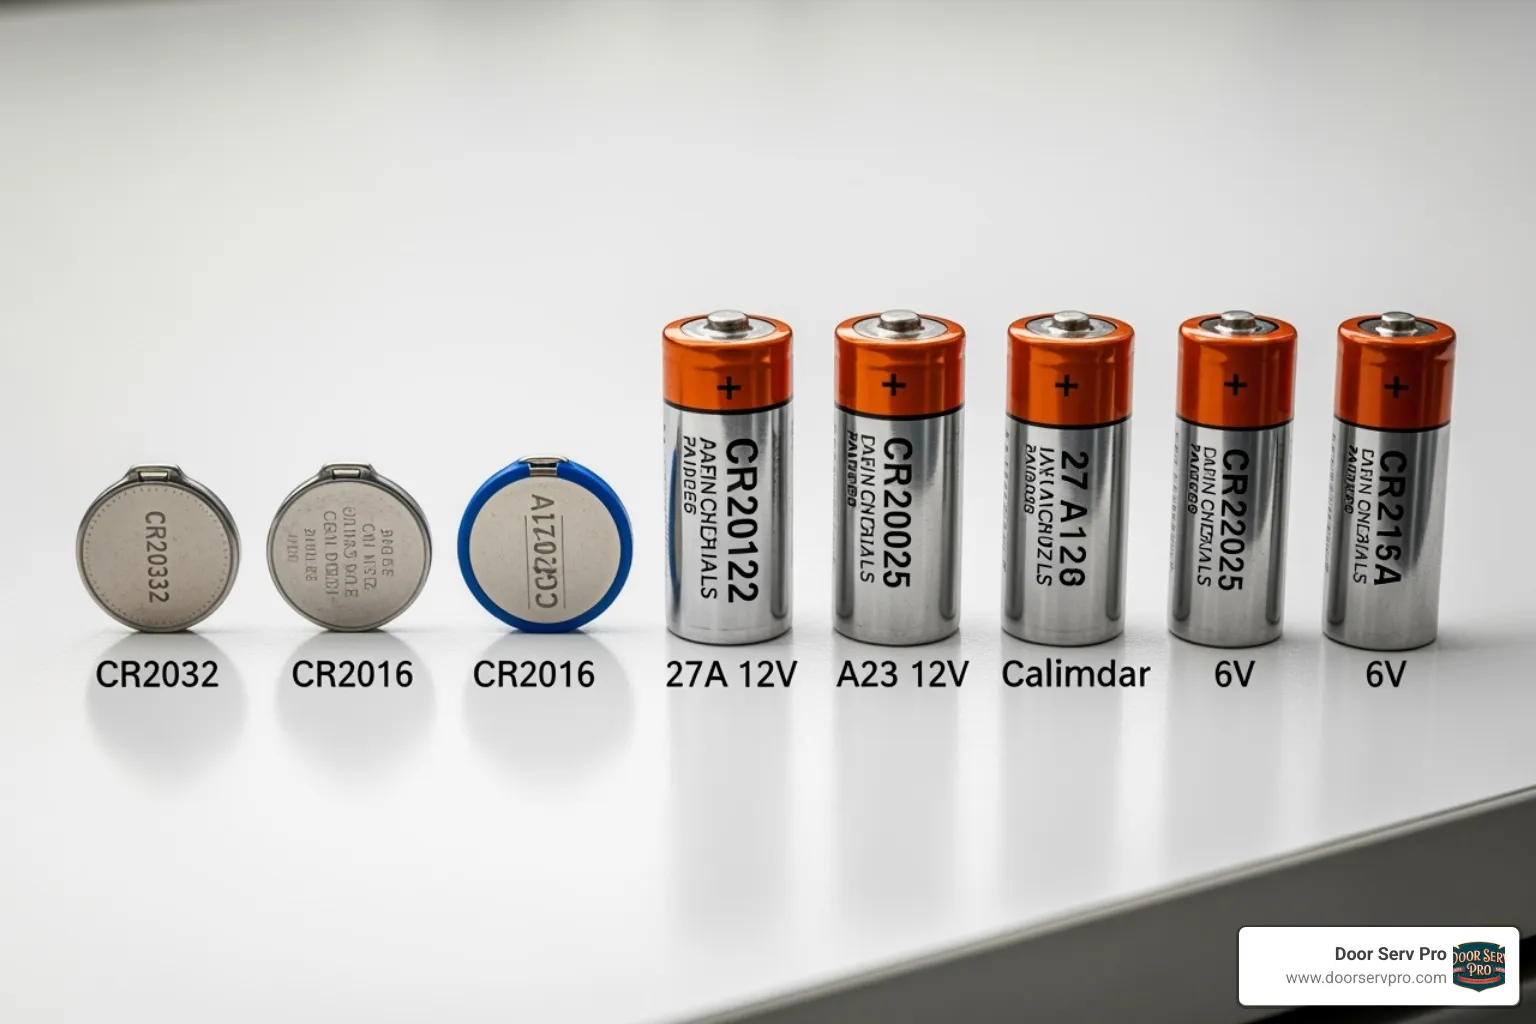
Garage door remotes use a variety of battery types, but a few are exceptionally common. Here's a quick overview:
Battery TypeVoltageTypical Remote Style / Use CaseNotesCR20323VCoin Cell / Wafer BatteryVery common for smaller, newer remotes, including Raynor, Sears Craftsman (post-1993), Garador/Hormann BiSecur HSE4, Henderson/Sommer, and Cardale remotes. Average lifespan is typically 2 years.27A12VCylindricalUsed in some universal garage door remotes.23A12VCylindricalSimilar in appearance to 27A, but slightly larger. Check carefully.12V (A23, MN21, L1028)12VCylindricalUsed in some Garador/Hormann remotes with blue buttons.6V6VCylindrical (often smaller)Used in some Garador/Hormann remotes with grey buttons.CR20163VCoin Cell / Wafer BatterySmaller version of CR2032, check the numbers carefully.
A Quick Guide to Your Garage Remote Battery Change
- Check the Old Battery: The easiest way to identify the correct battery is to look at the old one! The battery type and size are usually clearly identified on the side of the battery itself as a series of numbers and letters (e.g., "CR2032," "27A 12V").
- Read Your Manual: If you still have your remote's owner's manual, it will specify the exact battery type. This is always the most reliable source.
- Take the Old Battery to the Store: If you can't read the code or are unsure, simply take the old battery with you to a hardware store, electronics store, or even a supermarket. The staff can help you match it, or you can compare it to the options available. This is a safe option to ensure you get the correct replacement.
- Online Retailers: Once you know the battery type, you can easily find replacements online. Just be sure to purchase from reputable sellers to ensure you get quality batteries.
- Ensuring Correct Voltage: Always match the voltage. A 3V remote needs a 3V battery, a 12V remote needs a 12V battery, and so on. Using a different voltage can damage the remote.
What to Do If It Still Doesn't Work
You've done everything right with your garage remote battery change, carefully following each step, but your garage door is still giving you the silent treatment. Before you start questioning your DIY skills or consider launching that remote into orbit, take a deep breath. There are several more tricks up our sleeve that can get your door back to its obedient self.
Sometimes the issue isn't actually the battery at all, even when all signs pointed to it. Other times, a simple battery replacement can reveal underlying issues that were masked by the dying battery's symptoms.
Reprogramming your remote is often the next logical step. Many garage door openers require you to re-establish the connection between your remote and the opener after any power interruption, including battery changes. Don't worry – this process is usually much simpler than it sounds.
The antenna on your garage door opener unit also deserves attention. That thin wire hanging from your opener isn't just decorative – it's crucial for receiving signals from your remote. If it's damaged, coiled up, or touching metal surfaces, your perfectly functioning remote might as well be speaking a foreign language to your opener.
Checking for obstructions around your garage door system can also solve mysterious remote failures. Sometimes those safety sensors at the bottom of your door tracks get knocked out of alignment or covered with dust, causing the entire system to ignore remote commands as a safety precaution.
Troubleshooting After a Garage Remote Battery Change
Even with a fresh battery installed, connection issues can still prevent your remote from working properly. Cleaning the battery contacts inside your remote is worth trying, even if they looked clean during your battery replacement. Use a cotton swab with a tiny amount of rubbing alcohol to gently clean the metal contacts, then let them dry completely before testing again.
Inspect your remote for any damage while you have it open. Water damage, cracked circuit boards, or loose wires can all cause problems that a new battery can't fix. If your remote has taken a few tumbles or gotten wet, internal damage might be the culprit.
Re-pairing your remote with your garage door opener is often the magic solution. Most openers have a "learn" button on the motor unit itself. Press this button, wait for it to light up, then press and hold your remote's button within 30 seconds. You'll know it worked when the opener light blinks or you hear a click sound.
Your garage door opener unit itself might be the problem. Check that it's plugged in and getting power – it's amazing how often a tripped circuit breaker is the real villain. If your opener has a battery backup system, check its status lights too, as a dying backup battery can cause all sorts of confusing symptoms.
The photo-eye sensors near the bottom of your door tracks are another common troublemaker. These safety sensors must be clean, properly aligned, and free from obstructions. Even a spider web can cause your opener to ignore remote commands.
Finally, examine the antenna wire hanging from your opener unit. It should hang straight down without touching anything metal. A damaged or poorly positioned antenna can severely limit your remote's range and reliability.
For more detailed troubleshooting guidance and visual demonstrations, subscribe to my YouTube channel where you'll find step-by-step videos for various garage door opener brands and models.
When to Consider Alternatives or Professional Help
Sometimes despite your best efforts with the garage remote battery change and all the troubleshooting steps, your remote simply won't cooperate. This doesn't mean you've failed – it might mean your remote has reached the end of its useful life.
Keypad entry systems offer an excellent backup solution. These weatherproof units mount outside your garage and let you open the door with a simple code. They're particularly handy when your remote decides to quit working at the worst possible moment.
Smartphone apps are becoming increasingly popular for garage door control. If your opener has Wi-Fi capability, you can often control it from anywhere with an internet connection. This technology has saved countless homeowners from being locked out when their remotes fail.
Worn-out remotes are a reality of life. Buttons wear out, circuit boards fail, and internal components can get damaged from drops or moisture exposure. If your remote is several years old and has lived a hard life bouncing around in your car, replacement might be more cost-effective than continued troubleshooting.
When internal components are damaged beyond simple repair, or when you've exhausted all reasonable DIY options, it's time to call in professional help. Sometimes what appears to be a simple remote issue actually indicates problems with your opener's receiver, logic board, or other complex components.
At Door Serv Pro, we understand how frustrating garage door remote issues can be. Our NATE-certified technicians have seen every possible remote and opener combination over our 25+ years in business. We can quickly diagnose whether you need a simple remote replacement or if there's a deeper issue with your garage door system that requires professional attention.
Frequently Asked Questions about Garage Remote Batteries
After helping countless homeowners with their garage remote battery change needs over the years, we've noticed the same questions come up again and again. Let's tackle the most common ones so you can feel confident about maintaining your garage door remote.
How often should I change my garage remote battery?
Here's the simple answer: most garage remote batteries last about 2 years with typical use. But like most things in life, it's not quite that straightforward!
Your battery's lifespan really depends on how you use your garage. If you're someone who comes and goes multiple times a day, your battery will work harder and drain faster than someone who only uses their garage door a few times a week. It's just like your phone battery – the more you use it, the quicker it needs charging.
Environmental factors play a big role too. Those scorching summer days and freezing winter nights can be tough on batteries. Extreme temperatures make batteries work less efficiently and can shorten their life significantly.
The quality of the battery matters as well. We always recommend investing in good batteries from trusted brands. They might cost a dollar or two more, but they'll typically last longer and perform more reliably.
Our practical advice? Don't wait for your remote to completely die. If you notice any of those warning signs we mentioned earlier – like needing to press the button multiple times or getting closer to the garage – it's time for a fresh battery.
Do I need to reprogram my remote after a battery change?
This is probably our most frequently asked question, and the answer is usually a relieving "no!"
Most garage door remotes are designed to remember their programming even when the battery dies completely. The remote's unique code gets stored in what's called non-volatile memory, which means it sticks around even without power. Pretty smart, right?
That said, there are always exceptions. Some older remotes or certain specific models might need a quick re-pairing after a garage remote battery change. If your remote doesn't work right away after installing the new battery, don't panic – just try the reprogramming process we outlined earlier using the "learn" button on your garage door opener.
When in doubt, check your owner's manual first. It'll give you the definitive answer for your specific model. And remember, reprogramming is usually just a matter of pressing a couple of buttons – nothing too complicated.
How do I dispose of old garage remote batteries?
We're glad you asked! Proper battery disposal is something we care deeply about, and it's easier than you might think.
Never just toss old batteries in your regular trash. Those little powerhouses contain chemicals that don't belong in landfills, and we all want to do our part for the environment.
Most communities have battery recycling programs or collection points. Your local waste management company can point you in the right direction, or a quick online search for "battery recycling near me" usually does the trick.
Many electronics stores and hardware stores also accept old batteries for recycling. It's often as simple as dropping them in a collection box near the entrance. Some communities even host special household hazardous waste collection events where you can bring batteries along with other items like old paint or electronics.
The bottom line? A little effort to recycle properly goes a long way toward keeping our communities clean and healthy. Plus, many of the materials in batteries can be recovered and reused, which is pretty cool when you think about it.
Get Your Garage Door Back on Track
Congratulations! You've just mastered the art of a garage remote battery change – and honestly, doesn't it feel great to fix something yourself? There's something deeply satisfying about turning a frustrating morning into a five-minute victory with nothing more than a screwdriver and a battery that costs less than your morning coffee.
You've not only saved yourself the expense and hassle of a service call, but you've also gained a valuable skill that'll serve you well for years to come. Every time that little LED light blinks brightly or your garage door responds instantly from down the driveway, you can give yourself a well-deserved pat on the back.
Of course, we know that not every garage door challenge is as straightforward as a dead battery. Sometimes you'll encounter issues that go beyond what a simple garage remote battery change can fix – maybe your door is making unusual noises, moving unevenly, or the opener itself seems to be struggling. That's perfectly normal, and it's exactly why we're here.
At Door Serv Pro, we're a family-owned garage door company with over 25 years of expertise, proudly serving homeowners throughout WV, VA, PA, and MD. Founded by industry veteran Paul Wiese, we bring that perfect combination of technical know-how and genuine care that only comes from decades of helping families just like yours.
Whether you need expert repairs, routine maintenance, or a complete new installation, our NATE-certified team delivers round-the-clock service with a 100% satisfaction guarantee. We don't just fix doors – we create lasting impressions, one entryway at a time, changing houses into homes with best craftsmanship and innovative designs.
When your DIY skills have taken you as far as they can go, or when you simply want the peace of mind that comes with professional expertise, we're ready to help. Visit us for comprehensive garage door services: Expert Garage Door Services in Ashburn, VA
There's no shame in calling the professionals – sometimes the best DIY decision is knowing when to let the experts take over!
Need Help?
Contact us today to discuss your needs. Our team is ready to help.
About the author
Door Serv Pro
More articles
View all postsKeep reading
Related articles
Ready to Get Started?
Whether you need a repair, maintenance, or a new installation, our expert team is here to help.