Blog
Mastering Your Garage Door Keypad: No More Headaches!
Door Serv Pro
Reviewed by the Door Serv Pro service team · Trained, professional garage door technicians
Why Programming Your Garage Door Keypad Matters
Learning to program garage door keypad systems provides keyless entry to your garage. Whether you've installed a new keypad, moved into a home with an existing one, or need to update your security code, the process is surprisingly straightforward.
Quick Answer: Basic Steps to Program Any Garage Door Keypad
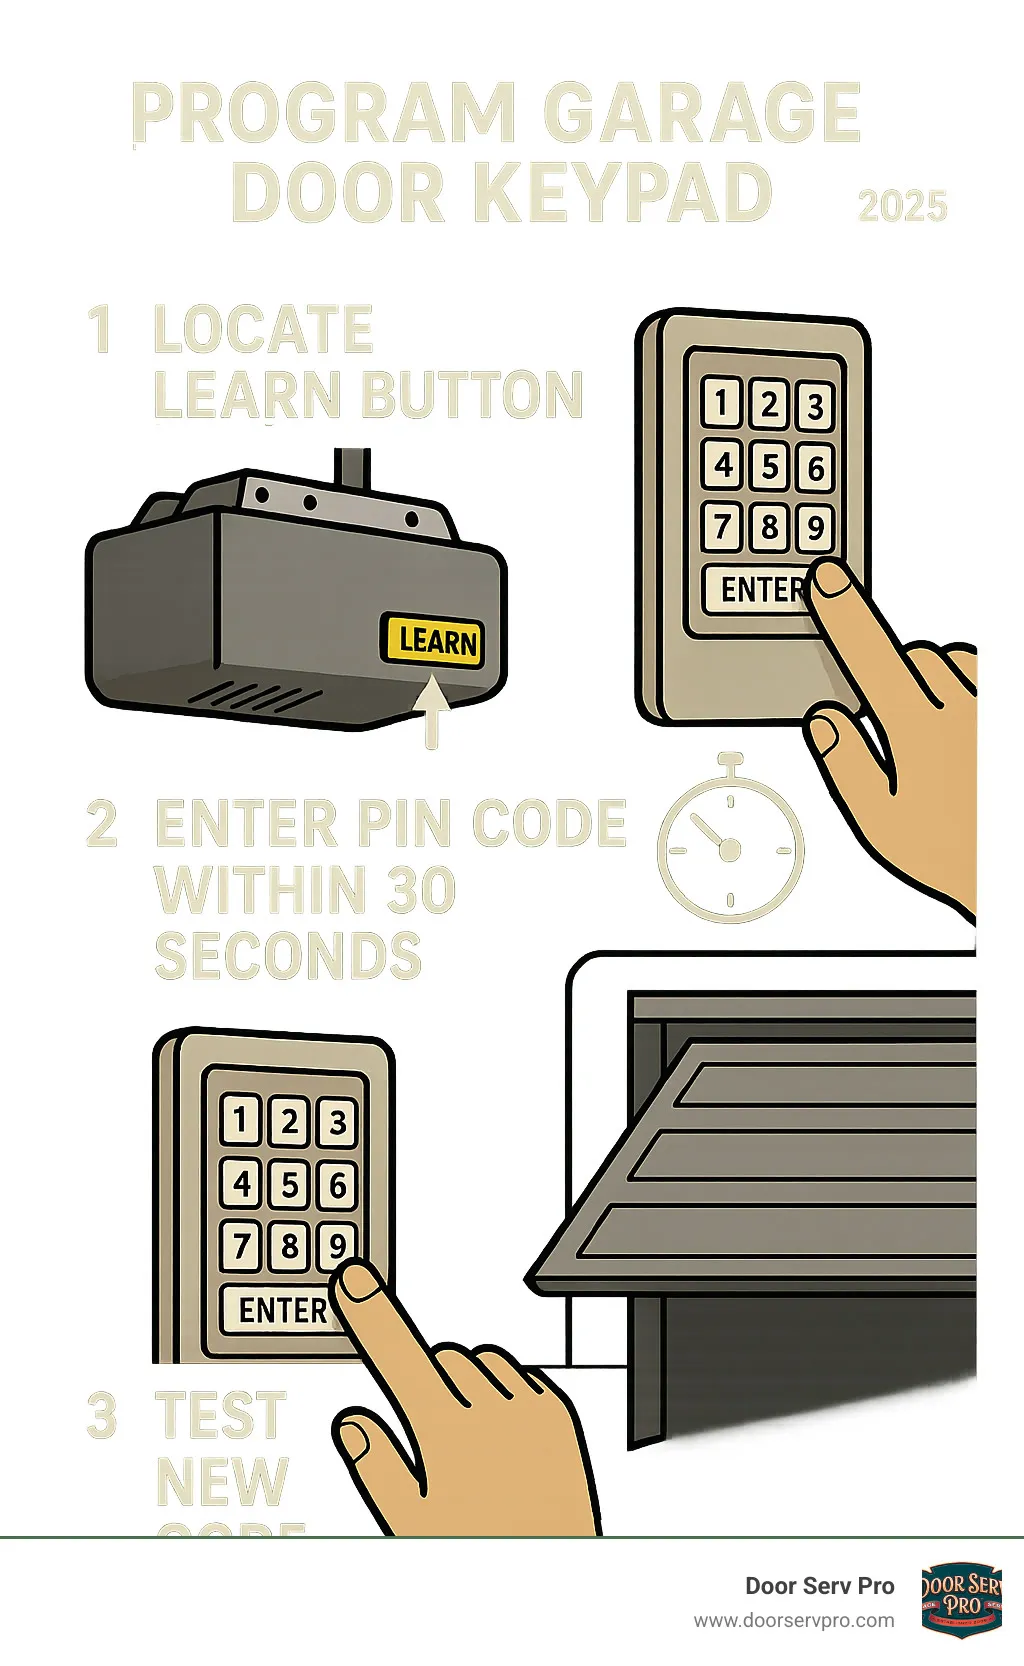
- Locate the Learn button on your garage door opener motor unit
- Press and release the Learn button until the LED light turns on
- Enter your 3-8 digit PIN on the keypad within 30 seconds
- Press the Enter/Program button on the keypad
- Test the code by entering your PIN and pressing Enter
Most garage door keypads follow this universal programming sequence, though specific button names and LED colors may vary by manufacturer. The key is working within that crucial 30-second window after pressing the Learn button – this is when your opener is ready to accept the new code.
As one homeowner found, "How to program your garage door keypad is really quite simple" once you understand the basic interaction between the keypad and your opener's programming mode.
Programming your keypad correctly means no more getting locked out during bad weather, no more searching for lost remotes, and the ability to provide temporary access codes for family members or service providers when needed.
Getting Started: Your Pre-Programming Checklist
Before you program garage door keypad systems, a quick pre-programming check will save you time and prevent multiple trips up and down a ladder. Gathering what you need now makes the process smooth and stress-free.
Finding the 'Learn' Button
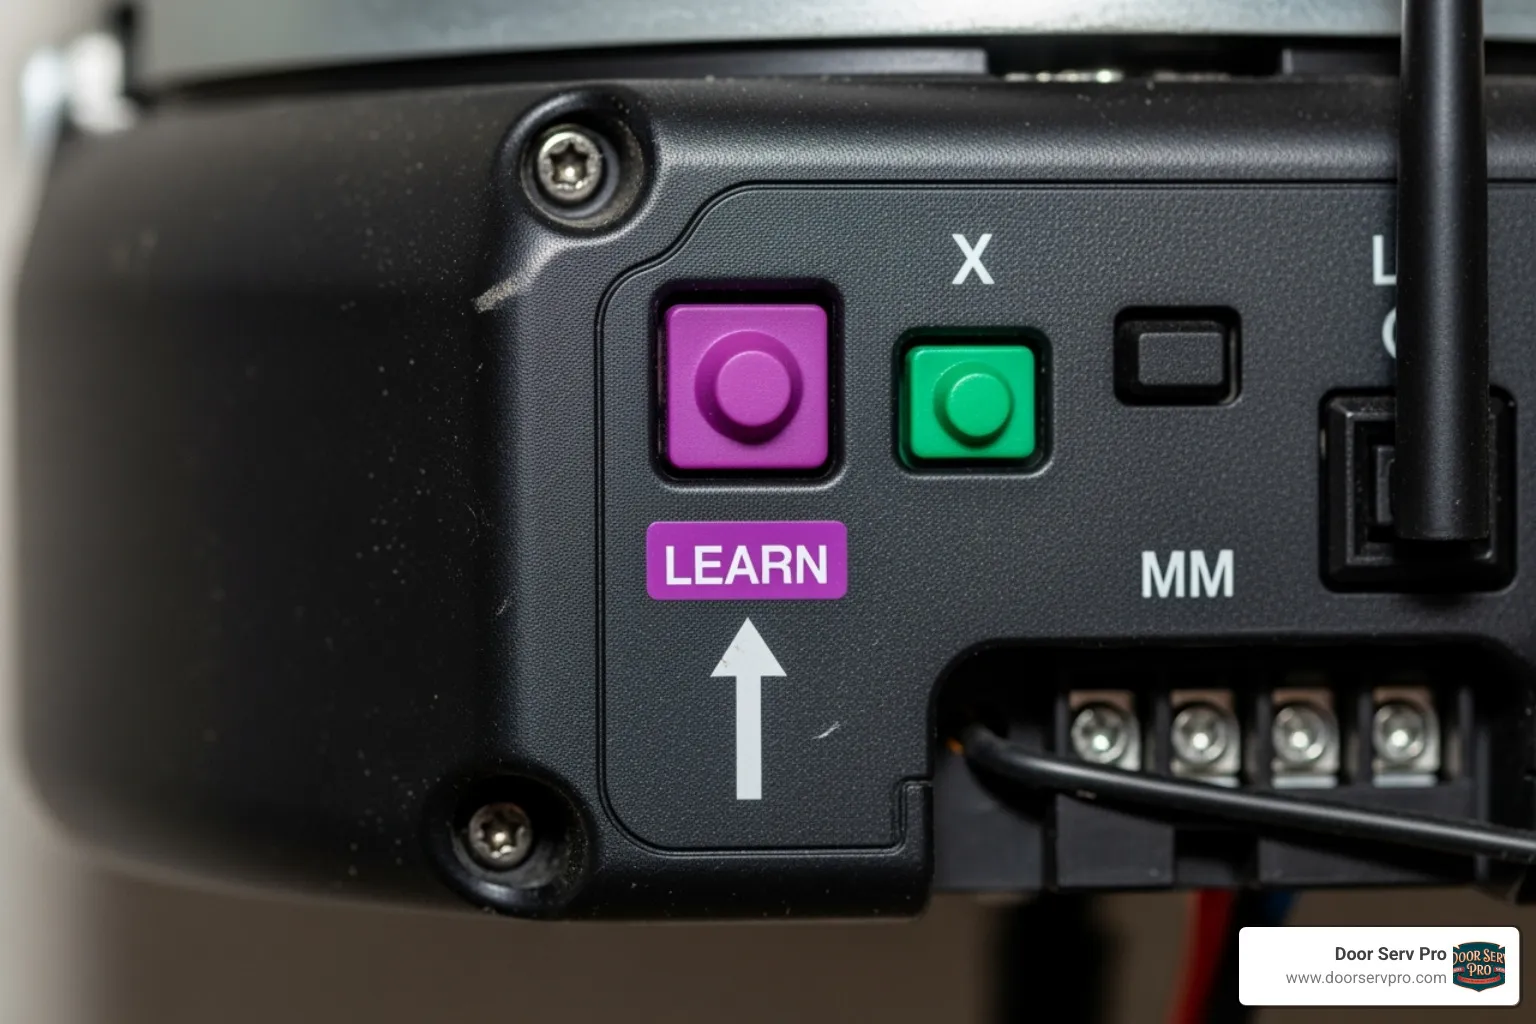
The Learn button is a small but crucial button that puts your opener into programming mode, creating a 30-second window to sync with your keypad.
Most Learn buttons are on the motor unit itself, typically on the back or side panel near the antenna wire. You might need to remove the light cover to get a clear view.
The button itself can be square, round, or rectangular, and its color often indicates the manufacturer or specific security features. A purple button might signal one brand, while red or orange could indicate another.
Having your opener model number handy is useful. If you're having trouble locating the button, that model number will point you to the right information in your user manual. And if your opener is getting old, you might want to explore The Advantages of a New Garage Door Opener Installation for improved security and convenience.
Remember to use proper ladder safety – set it on level ground, maintain three points of contact, and never overreach.
Checking Your Keypad
Your keypad is the other half of this programming partnership, so a quick check now prevents headaches later.
Start with the battery compartment. Most keypads use standard AAA batteries, and weak batteries are the top cause of programming failures. If the backlight function doesn't illuminate or keys feel sluggish, it's time for fresh batteries. Modern keypads remember their programming during battery changes, so you won't lose your code.
Next, inspect your keypad's weather protection. Make sure the keypad cover opens and closes smoothly to protect against the elements. Water damage is a common reason for keypad failure, but keeping the cover closed adds years to its life.
Finally, check that all buttons press cleanly and aren't sticking for reliable, hassle-free access.
The Universal Guide to Program Garage Door Keypad
With your equipment ready, it's time to program garage door keypad systems. While manufacturers use different button names or LED colors, the core programming steps are remarkably consistent.
The key is a 30-second window where your opener is receptive to new codes. If you miss the window, you can simply start over.
Basic Steps to Program Garage Door Keypad for a Single Door
The process is simple and quick once you've done it once.
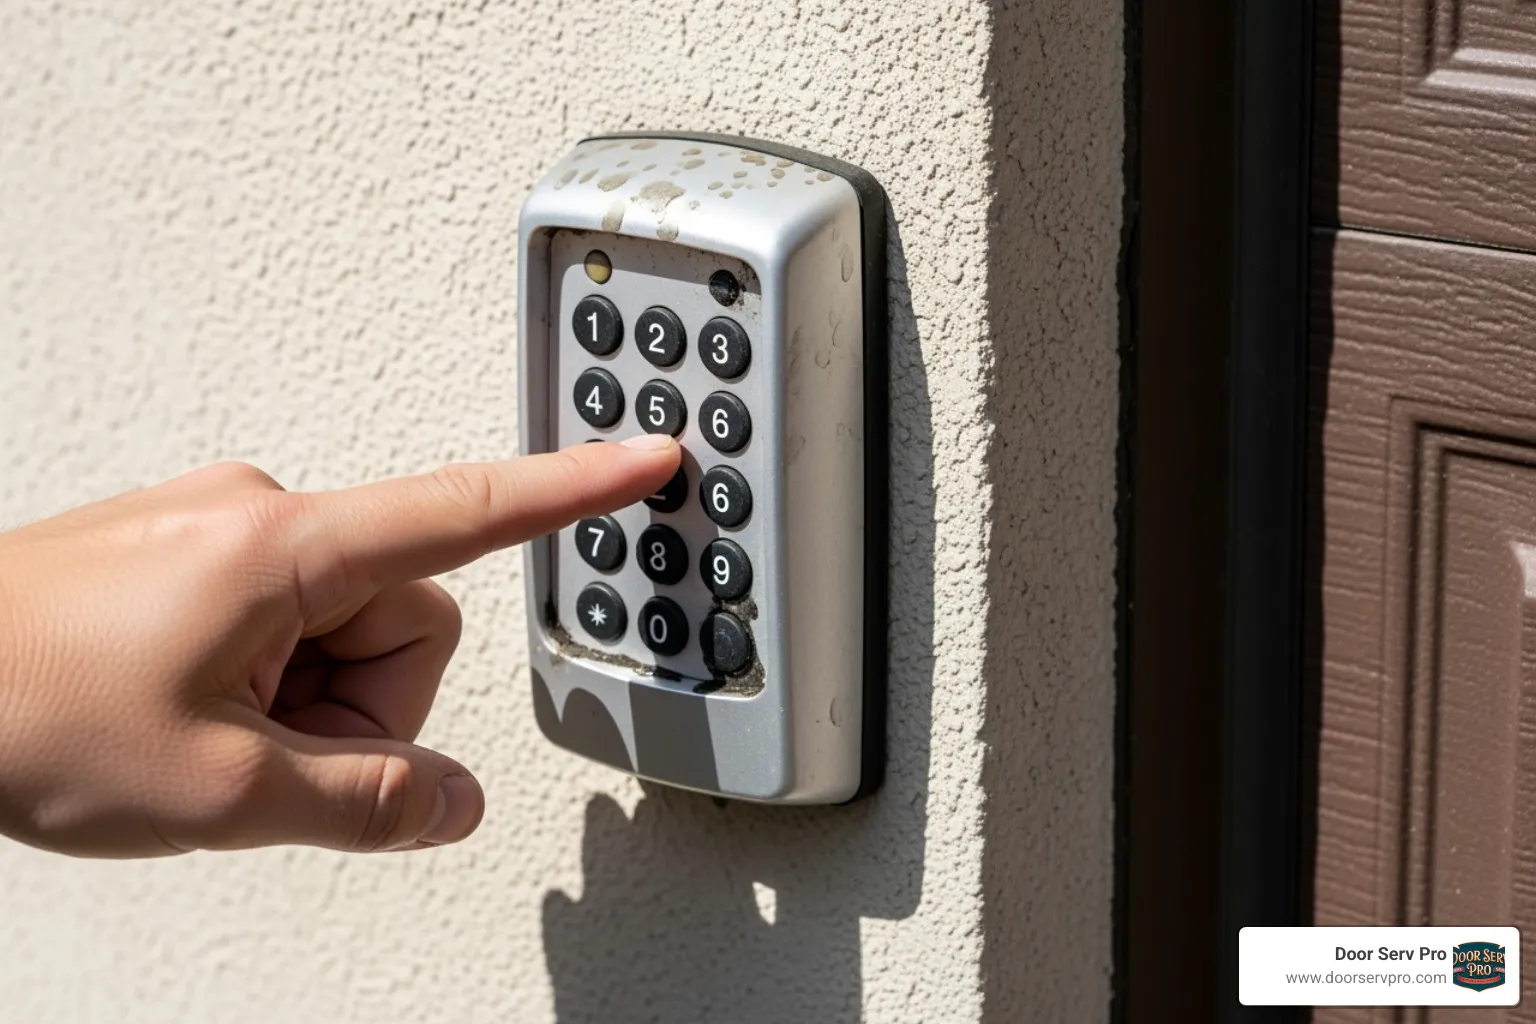
Start by waking up your opener. On your garage door opener's motor unit, press and release the Learn button. Don't hold it down. An LED indicator will light up, showing the opener is listening. This light might be steady or blink slowly.
Now move quickly to your keypad – you have about 30 seconds. Enter your chosen 4-digit PIN. Choose something memorable but not obvious. Most systems use 4 digits, but some accept 3 to 8.
Press the Enter or Send key on your keypad. Some keypads label this button as "Program" or use a symbol. This sends your new PIN to the opener.
Listen for the confirmation. Your opener will typically respond with a click sound or the opener light will flash once or twice, confirming it has accepted the new code.
If you're curious about how these systems have evolved, our guide on How Long Do Garage Door Openers Last? A Comprehensive Guide can help you decide if it's time for an upgrade.
How to Program Garage Door Keypad and Test Your New Code
Programming is only half the victory; testing confirms your keypad and opener are synced correctly.
Give your system a moment to settle. After the confirmation, wait for the lights to stop blinking completely (usually 10-20 seconds). Your opener is saving the new PIN to its memory.
Now for the moment of truth. Step back and enter your new PIN on the keypad, then press the Enter or Open button. Your garage door should now operate.
Watch for smooth door operation. If it works, you've successfully programmed your keypad.
If things don't go as planned, don't get discouraged. Troubleshooting failed attempts usually means starting over. The most common issue is running out of time in the 30-second window. Other causes include an incorrect PIN entry or weak keypad batteries.
Patience is key. Even professionals sometimes need a second attempt. Once you get it right, you'll have convenient, secure access.
Advanced Keypad Features & Security Best Practices
Once you master the basics of how to program garage door keypad systems, you can explore advanced features. Modern keypads are sophisticated security tools that offer control over who enters your home, allowing you to change codes, manage multiple doors, and provide temporary access.

Changing an Existing PIN or Handling a Forgotten One
Sometimes you need to update your garage door code for security or because you've forgotten it.
When You Remember Your Current PIN
If you know your existing code, you can often change it directly at the keypad without using the opener's Learn button. The process usually involves entering your current PIN, pressing a specific key (like # or Program), entering the new PIN, and pressing Enter. The opener light will blink to confirm the change. We recommend changing your code every 6-12 months.
Dealing with a Forgotten PIN
If you forgot your code, the best solution is to start fresh. Press the Learn button on your opener to enter programming mode, then enter your new PIN on the keypad within 30 seconds and press Enter. This overwrites the old, forgotten code.
The Nuclear Option: Clearing Everything
To erase all programmed codes and remotes from your opener's memory (e.g., when moving into a new home), press and hold the Learn button for about 6 seconds until its LED turns off. This wipes the slate clean, but you will need to reprogram every remote and keypad afterward.
For homeowners interested in the latest security technology, exploring Smart Garage Door Opener Installation: Benefits and Features can provide insights into advanced security features like rolling code technology.
Programming for Multiple Doors and Temporary Access
A single keypad can often control multiple openers and provide temporary access codes.
Managing Multiple Garage Doors
Most modern keypads can control up to three different garage doors, each with a unique PIN. After programming the first door, you'll follow a specific sequence to add others. This typically involves entering your primary PIN, pressing a Program button, selecting a door number (e.g., "2" for the second door), and then pressing the Learn button on the corresponding opener to complete the pairing. Keep a secure record of which PIN opens which door.
Creating Temporary Access Codes
This feature lets you provide access that automatically expires. You can create temporary PINs for:
- Guests: Set a code that expires after a few days.
- Service Providers: Give a plumber or electrician a code that works only for a set number of hours or uses.
- Deliveries: Create single-use codes for trusted delivery services to place packages safely inside the garage.
The setup process varies, but it generally involves using your main PIN to create a temporary one with a set time or usage limit. The code deactivates automatically once its conditions are met.
Troubleshooting Common Keypad Programming Problems
Even with perfect execution, programming a garage door keypad can hit a snag. Most issues are the system's way of communicating a problem, and understanding these signals makes troubleshooting easier.
What Blinking Lights on Your Opener Mean
Your garage door opener's LED lights use blink patterns to communicate during programming. Learning these signals saves time and frustration.
When you press the Learn button, a steady LED means the opener is listening and ready for a code within the 30-second window.
After you enter your PIN and press Enter, a single blink followed by the light turning off means the code was accepted.
Rapid blinking indicates an error. The opener may not have understood the signal due to timing out, an incorrect PIN entry, or signal interference. If this happens, wait for the blinking to stop and start over.
Your keypad also communicates. If the backlight is off, the batteries likely need replacing. Some keypads blink red to indicate a PIN entry error.
Since LED patterns vary by manufacturer, your user manual is the best reference. For complex issues, our team provides Guardians of Access: Essential Tactics for Garage Door Opener Repair.
Proper Keypad Installation and Mounting
Sometimes, programming failures are actually installation issues. A poorly mounted keypad can cause signal problems, weather damage, and intermittent failures.
Height matters. Mount your keypad at least 5 feet from the ground to keep it out of reach of small children while remaining comfortable for adults.
Ensure a clear line of sight between the keypad and the garage door opener for the most reliable signal transmission.
Keep your keypad well away from any moving parts of the garage door system for safety and to prevent damage.
Weather protection is crucial. While built for outdoor use, minimizing exposure to rain and sun helps prevent premature failure. Always keep the keypad cover closed.
When mounting, use the provided screws and secure them tightly. A proper two-point mounting system keeps the keypad stable and aligned for optimal performance. A well-installed keypad works better and lasts longer.
Frequently Asked Questions about Programming Garage Door Keypads
After helping countless homeowners with their garage door systems over the years, we've noticed the same questions come up again and again. Let's tackle the most common ones to help you feel confident about your keypad programming journey.
What is the typical length of a garage door keypad PIN?
Most garage door keypads accept PINs between 3 to 8 digits long, though 4 digits is the sweet spot for most residential systems. It's long enough to provide good security but short enough that you won't forget it when you're standing in the rain!
When choosing your code, think like a security expert for a moment. Avoid the obvious choices like "1234," "0000," or your house number – these are the first codes someone would try. Instead, pick something meaningful to you but random to others. Maybe the last four digits of your first phone number, or your wedding anniversary backwards. The goal is a number that rolls off your fingers naturally but would stump a stranger.
How often should I change my keypad code for security?
Every 6 to 12 months is our recommended refresh schedule for your garage door PIN. Think of it like changing your passwords – it's one of those small habits that pays big dividends for your home's security.
But don't wait for the calendar if circumstances change. Change your code immediately if you've shared it with temporary guests, service workers, or anyone whose access period has ended. The same goes if you suspect someone might have observed you entering it, or if you've had a security concern in your neighborhood.
The beauty of knowing how to program garage door keypad systems is that changing your code becomes a quick, two-minute task rather than a major project.
Will I lose my programmed code if I change the keypad's batteries?
Here's some good news that surprises many homeowners: No, you won't lose your programmed code when you replace the batteries! Modern wireless keypads are smart enough to store your PIN in what's called non-volatile memory, which means it sticks around even when the power goes out.
This design makes perfect sense when you think about it – imagine the frustration if you had to reprogram your keypad every time the batteries died! Instead, you simply pop in fresh AAA batteries, and your keypad picks up right where it left off.
The telltale sign that your batteries need changing is when the keypad's backlight stops illuminating when you press the buttons. Don't wait until it's completely dead – swap those batteries as soon as you notice the light getting dim. Your future self will thank you when you're not fumbling with a dead keypad in the dark.
Your Key to Convenient and Secure Access
Learning to program garage door keypad systems is a satisfying DIY win. You've gained the freedom to come and go without juggling keys or remotes and the ability to control your home's security by creating temporary codes and changing your PIN.
We hope this guide has turned a daunting task into one you can tackle with confidence. It's empowering to understand and manage your home's systems.
The benefits you've open uped go beyond convenience. You've improved your home security, saved money on service calls, and gained the knowledge to manage access to your home.
At Door Serv Pro, we believe in empowering homeowners with knowledge while being here when you need professional expertise. As a family-owned company with over 25 years of experience serving WV, VA, PA, and MD, we've helped countless families create secure, convenient access to their homes.
Sometimes, though, you need the pros. If your keypad won't cooperate or your opener is showing its age, don't hesitate to call in reinforcements. Our NATE-certified team has seen it all and brings technical excellence with a personal touch.
Whether you need help with a stubborn programming issue or are considering a system upgrade, we're here to help with round-the-clock service and a 100% satisfaction guarantee. Your family's security and convenience matter to us.
For expert assistance with your garage door system, explore our garage door services in Ashburn, VA. We don’t just fix doors—we create lasting impressions, one entryway at a time.
Need Help?
Contact us today to discuss your needs. Our team is ready to help.
About the author
Door Serv Pro
More articles
View all postsKeep reading
Related articles
Ready to Get Started?
Whether you need a repair, maintenance, or a new installation, our expert team is here to help.